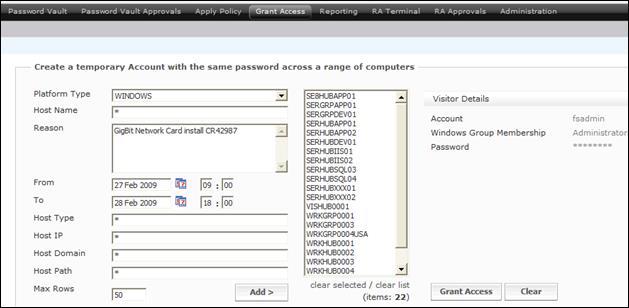
This page is used to create a temporary administrator account with a common password across a number of computers. The name of the administrator, the group membership and default lifetime (the number of days the account will exists) is configured by the ForestSafe Administrator.

Figure 26 : Grant Access
This page performs the action against all computers in the list box. This list box can be filled from a single Add click, or it can be built up over successive Add clicks. When the list is complete the user clicks Grant Access.
To grant access to a set of computers
1. Select the criteria to match the set of computers. These fields all accept wildcards and SQL pattern matching (see Pattern matching on data entry)
- In the Host Name field enter the host name pattern of the computers or
- In the Host Type field enter the host type pattern of the computers or
- In the Host IP field enter the host IP address pattern of the computers or
- In the Host Domain field pull down the name of the domain
- In the Host Path field enter the host path pattern of the computers
2. In the Reason field enter a reason for granting access.
3. Click Add to add all these computers to the list box on the right-hand side.
If the number of rows in a single selection is greater than the number in the Max Rows field an error message appears. Increase the Max Rows if necessary. The page has a maximum rows default value with a ceiling which is configured by the ForestSafe Administrator.
4. If required, repeat 2 and 3 until all the computers are shown in the list box.
5. If required remove some or all items from the list box
- To remove a single computer select it and click clear selected
- To remove all computers click clear list
6. If required select the From date and time when the administrator will be created.
- Click the From calendar control and select the from date.
- In the From hour and minute fields enter the from time.
7. If required select the To date and time when the administrator will be deleted.
- Click the To calendar control and select the to date.
- In the To hour and minute fields enter the to time.
8. Click Grant Access.
9. Click OK on the confirmation dialog
The user can choose to start the access immediately or they can start it at some future time. Access can be applied for days before it is required. ForestSafe does not create the account until the time specified.
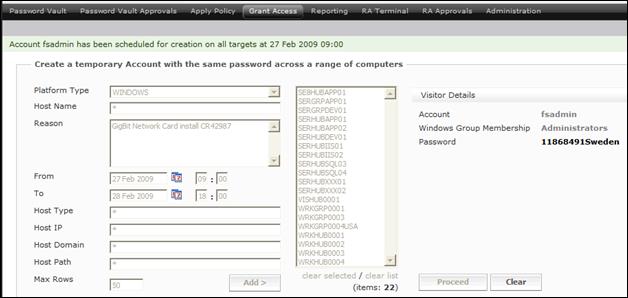
If successful, depending how the system is configured the password may appear alongside the Password field, overtyping the asterisks, along with an information message. Otherwise is will be available through the Password Vault.

Figure 27 : Grant access request
If grant access fails, an Error message is displayed, explaining why the requested grant access is not possible.
